
Blooming
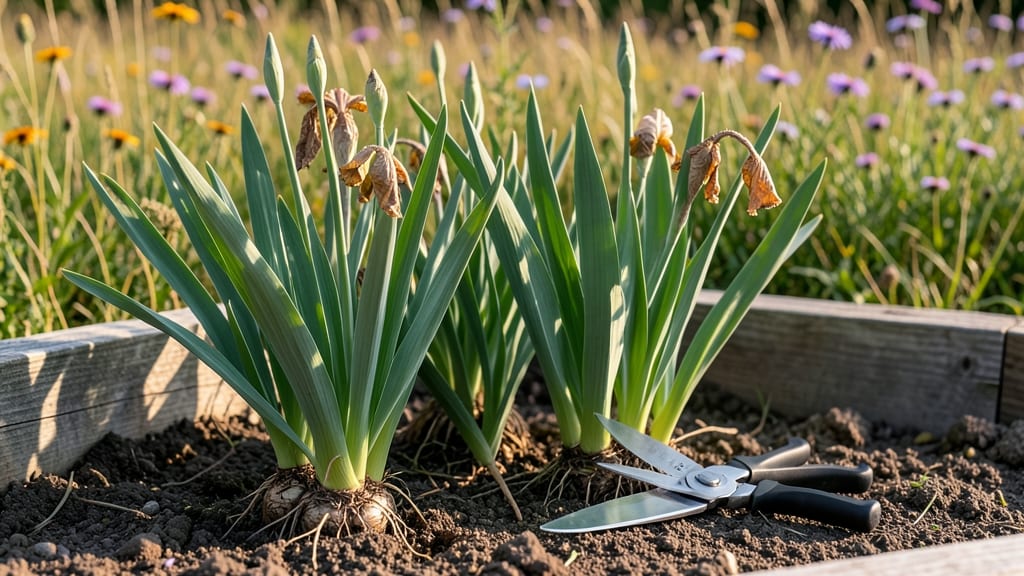
Your irises just stole the show—now it's time to keep them thriving. 🌸 After those dramatic blooms fade, the real work begins: pruning, dividing, and prepping for next year's performance. Skipping these steps means fewer flowers and weaker plants, but doing it right guarantees a repeat showstopper display.
The first move is deadheading spent blooms right away to redirect energy to the rhizomes. Then, in late summer or early fall, dig up crowded clumps and divide them every 3-4 years.
Healthy rhizomes should be firm, plump, and about the size of a bar of soap—anything smaller or mushy gets tossed. This keeps your irises vigorous and prevents overcrowding.
By the time frost arrives, your irises will be dormant but ready. A light mulch of compost or straw protects them through winter, while fertilizing in early spring jumpstarts next season's growth. With these simple steps, you'll have irises that bloom bigger, brighter, and for weeks longer than your neighbors'.
Pro tip: Mark where you planted divisions so you don’t accidentally dig them up next year. And if your irises start looking tired after a few seasons, it’s time to refresh them—new growth means more dramatic blooms ahead.
📚 In This Guide
- What you need
- Instructions
- Tips and common mistakes
- Wrapping up and next steps
What you need
- ● Pruning shears or sharp garden scissors – Clean, sterilized tools to avoid spreading disease.
- ○ Gloves (optional but recommended) – Garden or work gloves to protect hands from thorns and dirt.
- ● Compost bin or yard waste bag – For deadheading (removing spent blooms) and trimming foliage.
- ● Sharp knife or spade – For dividing rhizomes (if propagating).
- ● Watering can or hose – To hydrate plants before and after pruning.
- ○ Mulch (optional but helpful) – Organic mulch (straw, shredded leaves, or bark) to retain moisture and protect roots.
- ● Disinfectant (rubbing alcohol or bleach solution) – To sterilize tools between cuts.
- ● Garden twine or labels – For marking new divisions if replanting.
- ● Fertilizer (low-nitrogen, balanced formula) – To revitalize soil after pruning.
- ● Plastic pots or containers – For temporary propagation if starting new plants.
- ○ Pruning sealant (optional) – To protect large cuts on rhizomes (though iris heals well naturally!).
What to do with iris after they bloom: step-by-step care
Here’s how to keep your irises thriving—without the guesswork—so they reward you with even bigger blooms next year.
✂️ Step 1: Prune the Faded Flower Stems
Once your irises finish blooming, cut the stems back to just above the first set of leaves. This keeps the plant’s energy focused on root and leaf growth instead of seeding. I use clean, sharp pruners to avoid tearing the stems—irises hate rough cuts. The goal is to remove the spent blooms while leaving the foliage intact.
Wait until the blooms have fully faded and the pods begin to dry out before pruning. If you cut too early, you might accidentally remove buds that haven’t opened yet. And don’t worry—you’re not hurting the plant by removing the stems. In fact, this step prevents the plant from wasting energy on seed production, which would otherwise weaken next year’s blooms.
🌿 Step 2: Leave the Foliage Until It Yellows Naturally
Here’s the thing—don’t cut back the leaves after blooming. The foliage needs 8-10 weeks to photosynthesize and store energy in the rhizomes (those thick, horizontal roots). I know it looks messy, but those yellowing leaves are powering next year’s flowers. If you remove them too soon, your irises will bloom poorly—or not at all.
Watch for the leaves to turn completely yellow and flop over on their own. That’s your signal to trim them back to about 6 inches above the rhizome. If you’re impatient, you’ll see smaller, weaker blooms next season. Trust the process—your irises are storing up for a bigger show.
🪴 Step 3: Divide Overcrowded Clumps Every 3-4 Years
Irises multiply fast, and when clumps get too crowded, blooms shrink and multiply. Dig up the rhizomes in late summer or early fall when the foliage has turned brown. Gently separate the sections, making sure each piece has at least one fan of leaves and a healthy root system. I use a sharp knife to cut through tough rhizomes—never pull them apart, or you’ll damage the growing points.
Replant the divisions 2-3 inches deep in well-draining soil, spacing them 12-18 inches apart. Water lightly after planting, but don’t overdo it—they hate soggy roots. This is the secret to keeping your irises vibrant for decades. If you skip dividing, you’ll end up with a sea of small, weak blooms instead of showstopping spikes.
💧 Step 4: Feed and Mulch for Next Season’s Growth
After dividing (or by early autumn if you didn’t), add a low-nitrogen fertilizer to encourage root growth. I use a balanced 10-10-10 or a phosphorus-heavy formula like 5-10-10. Spread it around the base of the plants and water it in well. Too much nitrogen now will make the foliage grow at the expense of blooms—we want the opposite.
Top with 2-3 inches of mulch, like shredded bark or straw, to protect the rhizomes over winter. This keeps the soil temperature stable and prevents heaving during freeze-thaw cycles. In spring, remove the mulch once new growth appears—irises need sunlight to thrive, and mulch piled against the rhizomes can cause rot.
⏰ Step 5: Watch for Pests and Diseases
Irises are tough, but iris borers and fungal issues can sneak in after blooming. Inspect the foliage for chewed stems or sawdust-like frass—that’s borers at work. If you spot them, cut out the affected leaves immediately and dispose of them in the trash (not compost). For prevention, I spray neem oil in late summer as a deterrent.
Also, keep an eye out for leaf spot fungus, which looks like dark, water-soaked patches. Remove infected leaves right away and avoid overhead watering. Healthy irises with good airflow rarely get sick, but a little vigilance goes a long way. A few minutes now saves hours of cleanup later.
Tips & tricks for perfect post-bloom iris care
These little tricks will help you avoid common mistakes and get irises ready for next year’s spectacular display.
Pruning Precision: Use sterilized pruners to cut the faded flower stems just above the first set of leaves—never below. I’ve seen gardeners accidentally cut into the rhizomes, which weakens the plant. A quick wipe of the blades with rubbing alcohol between cuts prevents spreading any potential diseases. The goal is clean cuts that redirect energy to root growth, not wasted energy on healing wounds.
Seasonal Timing: The 8-10 week foliage retention period starts immediately after blooming ends. Mark your calendar when you prune the stems—this helps track when to finally trim the yellowed leaves. I set a reminder on my phone so I don’t accidentally cut too early. Remember, those yellow leaves are like little solar panels storing energy for next spring’s blooms.
Division Strategy: When dividing those crowded clumps in late summer or early fall, look for rhizomes that are at least 1-2 inches wide with healthy roots. Smaller pieces won’t establish well. I like to organize them by size—larger rhizomes get the prime planting spots, while smaller ones go in less visible areas. This ensures your most vigorous plants get the best growing conditions for maximum bloom potential next season.
Fertilizer Wisdom: That low-nitrogen fertilizer isn’t just about feeding—it’s about balance. Too much nitrogen now will make your irises focus on leaf growth instead of storing energy for blooms. I mix my 10-10-10 fertilizer with compost to give a gentle boost without risking overfeeding. Think of it as a slow-release energy drink for your iris rhizomes rather than a quick sugar rush.
Pro Tips for What To Do With Iris After They Bloom
- These little tricks will help you avoid common mistakes and get irises ready for next year’s spectacular display.
- Pruning Precision: Use sterilized pruners to cut the faded flower stems just above the first set of leaves—never below.
- Seasonal Timing: The 8-10 week foliage retention period starts immediately after blooming ends.
Frequently asked questions
Got questions about post-bloom iris care? You’re not alone! Here are some of the most common concerns—and straightforward answers—to keep your irises thriving for years to come.
Do I have to cut back iris flowers after they bloom?
Yes—but not the stems. Trim only the spent blooms (the flower stalks) down to the first healthy leaf or fan. This redirects energy to the rhizomes (the thick, fleshy roots) so they store nutrients for next year’s dazzling display. Pro tip: Use clean, sharp shears to avoid spreading disease!
When is the best time to prune iris after flowering?
Act fast! Prune the flower stalks as soon as the blooms fade (usually 2–4 weeks after flowering). For leaf removal, wait until after the foliage turns yellow (late summer/early fall). This timing ensures you’re not robbing the rhizomes of sunlight or nutrients they need to recharge.
Can I divide my iris right after it blooms?
Not yet! Wait until late summer or early fall (after the leaves yellow) to divide iris. Post-bloom is too early—the rhizomes are still focusing on recovery. Dividing too soon can stress the plant and reduce next year’s flowers. Bonus: This is also the perfect time to replant divisions for a head start!
What if my iris leaves turn brown or mushy after blooming?
Brown, mushy leaves often signal rot (from overwatering or poor drainage). Fix it: Reduce watering, improve soil drainage (add sand or gravel), and trim affected leaves above the healthy tissue. If the rhizome itself is soft or smells bad, it’s likely dead—remove it to prevent spreading disease.
Can I use iris leaves or flowers for anything after they bloom?
Dried iris flowers
make stunning potpourri or pressed arrangements (just lay them flat under a heavy book for 2–4 weeks). As for leaves, they’re best left on the plant—they’re the plant’s solar panels! But if you’re really crafty, you can use them for dyeing (they produce a soft yellow-green hue).
Wrapping up and next steps
Don’t let your irises fade into the background after their stunning bloom—turn them into next season’s star! With a little care, you can prune spent flowers, divide overcrowded clumps, and even propagate new plants for free.
Whether you’re reviving your garden beds or sharing cuttings with fellow gardening enthusiasts, every step keeps your irises thriving. Now’s the perfect time to roll up your sleeves and give them the love they deserve!
🌱 Next step: Pick one task from this guide—prune, divide, or propagate—and start today. Your future blooms will thank you! 🌸