
Orchid Care
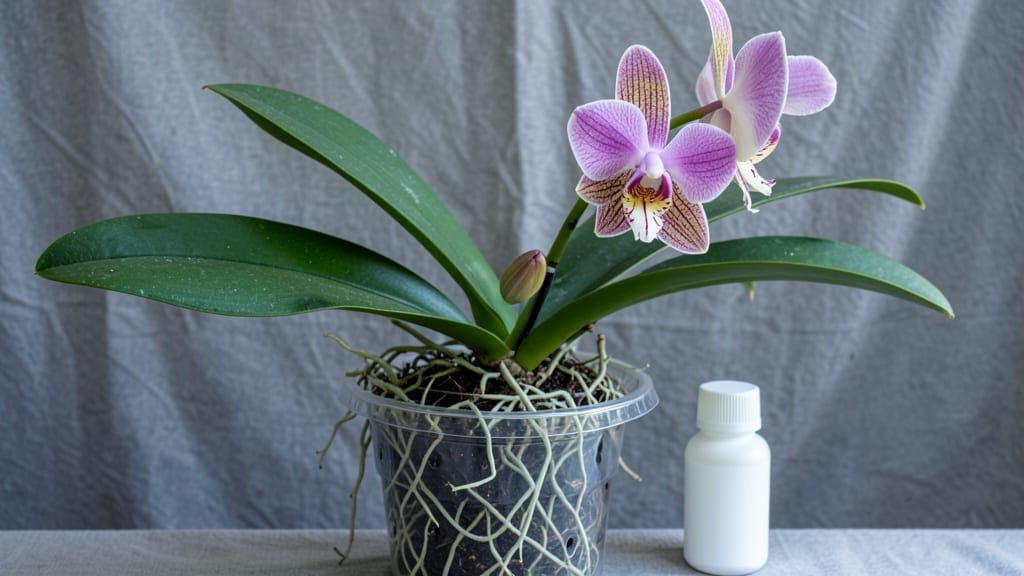
Your orchid’s blooming journey starts with tiny green spikes that could become next year’s showstopper. 🌱 I’ve watched orchids go from bud formation to post-bloom recovery, and each stage needs its own care routine—light, water, and even humidity shift dramatically.
The first phase is all about patience: those little buds need bright, indirect light (no harsh sun) and just enough water to keep the roots slightly damp. Overwatering here is the fastest way to lose those delicate spikes before they even open.
Think of it like raising a baby—gentle, consistent care. Once flowers open, you’ll see the payoff: vibrant blooms that last weeks. But here’s the secret—after they fade, don’t cut the stem! With proper care, that same stem can produce new buds for another round of flowers.
It’s like getting two seasons for the price of one. For those tricky moments (like when buds drop before opening), we’ll cover fixes. The key is understanding what each stage actually needs—not just what you think it needs. Let’s break it down step by step.
📚 In This Guide
- What you need
- Instructions
- Tips and common mistakes
- Wrapping up and next steps
What you need
- ● Orchid plant – Choose a healthy Phalaenopsis (moth orchid) or other species suited to your climate.
- ● Well-draining orchid mix – 1 bag (1-2 cubic feet) of bark-based or sphagnum moss mix (avoid regular soil!).
- ● 6-inch clay or plastic pot – With drainage holes (1-2 pots per orchid, depending on size).
- ● Balanced orchid fertilizer – 1 bottle (20-20-20 or 10-10-10 NPK ratio, diluted to half-strength).
- ● Spray bottle – 8-16 oz for misting (avoid tap water; use rainwater or distilled water if possible).
- ○ Humidity tray or pebble tray – Optional but helpful for maintaining 40-70% humidity.
- ○ Grow lights (optional but recommended) – LED or fluorescent (12-16 hours/day, 4000-6500K color temp).
- ● Scissors or pruning shears – Sterilized for trimming spent spikes.
- ● Orchid mounting board – For species like Dendrobium or Cattleya that thrive without soil.
- ● Thermometer/hygrometer – To monitor temperature (60-80°F) and humidity.
- ● Ant dessicant or sticky traps – To deter pests like aphids or mealybugs.
- ● Orchid-specific repotting kit – Includes gloves, wire, and moss for easier repotting.
Understanding orchid blooming stages: what to expect at each phase
Here’s how to recognize and care for your orchid through every growth phase—no guesswork involved.
🌱 Step 1: Identify the Growth Phase (New Leaves Emerge)
After flowering, your orchid enters a growth phase that lasts 6-12 months. You’ll notice 1-2 new leaves sprouting from the base—these are your plant’s energy reserves for future blooms. Healthy growth leaves have a firm, upright shape and deep green color (no yellow or brown spots).
This is the time to increase watering slightly—keep the potting mix slightly moist (not soggy) by watering once a week with room-temperature water. Avoid letting the mix dry out completely, but don’t drown the roots. You’ll know it’s right when water runs freely through the pot’s drainage holes.
☀️ Step 2: Spot the Blooming Trigger (Spike Development)
When a flower spike (that thick, leafless stem) emerges from the center of your orchid, it’s your cue to adjust care. This spike can appear pale green or reddish and might look shriveled at first. Don’t trim it—let it grow naturally for 4-6 weeks before deciding if it’s viable.
During this time, reduce fertilizer to half-strength (or skip it entirely) to encourage the spike to focus on blooming, not leaf growth. Place your orchid in bright, indirect light—think east or north-facing window—to prevent leaf burn. If the spike turns yellow or brown, it’s not getting enough light.
🌸 Step 3: Care During the Bud Stage (Color and Shape Appear)
Once buds form along the spike, they’ll start as tiny green nubs and gradually swell. This is the most delicate phase—bud blast (buds dropping off) happens when conditions change suddenly. Keep temperature stable (65-75°F day, 55-65°F night) and humidity high (use a pebble tray or humidifier if below 50%).
Water only when the top inch of mix feels dry—overwatering now causes buds to rot before they open. If your home runs dry, mist the leaves lightly in the morning to mimic natural humidity. Avoid drafts, cold windows, or direct heat sources—consistency is key during this 3-6 week window.
🌿 Step 4: Maintain Through Full Bloom (Open Flowers)
When flowers open, they’ll last 2-6 weeks, depending on the variety. Phalaenopsis (moth orchids) often bloom the longest, while Cattleyas may fade faster. Keep light bright but indirect—no direct sun, which scorches petals. Rotate the pot quarter-turn weekly so all sides get even exposure and the blooms stay upright.
Water every 7-10 days, letting excess drain completely. Avoid getting water on the flowers themselves—use a spray bottle for the base of the plant. If flowers start wilting or drooping, increase humidity or move to a cooler spot. Never fertilize during bloom—wait until spikes turn brown before resuming feeding.
⏰ Step 5: Post-Bloom Care (Rest and Recovery)
After flowers fade, don’t trim the spike unless it’s shriveled and brown—some orchids (like Dendrobium) rebloom from old spikes. If it’s green but leafless, it might produce a child orchid (baby plant) in 3-6 months. For dead spikes, cut 1 inch above a node (bump on the stem) with sterilized scissors to encourage new growth.
Return to regular watering (when top 1-2 inches dry) and resume fertilizer (balanced 20-20-20, every 2 weeks). This rest phase is crucial—skip it, and your orchid won’t rebloom. Place it in medium light (like a west-facing window) and watch for the next growth spike in 4-8 months.
Tips & tricks for orchid blooming stages
Here's what I've learned after watching orchids bloom for years—these little details make all the difference.
Leaf Health is Everything: In Step 1, when those 1-2 new leaves emerge, pay close attention to their shape and color. Healthy leaves should be firm and upright—if you notice any yellowing or brown spots, it's a sign of overwatering or poor drainage. I've seen orchids with perfect spikes fail to bloom because of weak leaves. Give them that extra week of slightly increased watering (but never soggy!) to build strength for future blooms.
Lighting Secrets for Bud Development: During Step 3's delicate bud stage, the 65-75°F daytime temperature range is crucial but often misunderstood. If your home runs warmer, move your orchid to a cooler spot—buds develop best in stable conditions. I've had bud blast happen twice when my orchid sat near a sunny window; now I use sheer curtains to diffuse light while keeping it bright. The key is indirect light that mimics natural forest conditions.
Post-Bloom Spike Strategy: When you're deciding what to do with that spent spike in Step 5, don't trim it too soon! Some orchids like Dendrobium can rebloom from old spikes if you wait 3-6 months. I keep mine until it's completely brown and shriveled before cutting—this gives any potential child orchids a chance to form. Just remember to cut 1 inch above a node with sterilized scissors to prevent disease.
Pro Tips for Orchid Blooming Stages
- Here's what I've learned after watching orchids bloom for years—these little details make all the difference.
- Leaf Health is Everything: In Step 1, when those 1-2 new leaves emerge, pay close attention to their shape and color.
- Lighting Secrets for Bud Development: During Step 3's delicate bud stage, the 65-75°F daytime temperature range is crucial but often misunderstood.
Frequently asked questions
Got questions about your orchid’s blooming journey? You’re not alone—orchid care can be tricky! Here are answers to the most common questions about orchid blooming stages, from timing to troubleshooting.
How long does each orchid blooming stage last?
Timing varies by species, but here’s a general breakdown:
- Bud stage: 2–4 weeks (buds form and swell).
- Bloom stage: 2–8 weeks (depends on variety—Phalaenopsis last ~2–3 weeks; Cattleyas up to 2 months).
- Post-bloom: 3–6 months (resting phase before reblooming).
Why isn’t my orchid blooming on schedule?
Orchids need specific triggers to bloom, like:
- Temperature shifts (e.g., 10°F drop at night for 3–4 weeks).
- Reduced watering (let roots dry slightly between waterings).
- Bright, indirect light (south/west windowsills work best).
Can I force my orchid to bloom faster?
While you can’t speed up natural stages, you can optimize conditions:
- Move it to a cooler spot (55–65°F) for 4–6 weeks to mimic winter.
- Use a phosphorus-rich fertilizer (like 10-30-20) during bud formation.
- Avoid repotting during bloom—stress delays flowering.
What should I do with dead orchid flowers?
After blooms fade:
- Snip spent spikes above a node (a bump on the stem) to encourage reblooming (Phalaenopsis).
- Cut back to the base only if the spike is yellow/brown (no new buds).
- For Cattleya/Dendrobium, remove dead spikes entirely—they won’t rebloom from old stems.
My orchid buds turned brown before opening—what went wrong?
Brown buds usually signal environmental stress. Common culprits:
Issue
Fix
Too much direct sun
Move to indirect light (east-facing window or sheer curtain).
Temperature fluctuations
Keep consistent temps (60–80°F day, 55–65°F night).
Overwatering
Water only when potting mix dries 50%; ensure pots have drainage.
Pests (scale/mealies)
Isolate the plant and treat with neem oil or insecticidal soap.
Wrapping up and next steps
Understanding your orchid’s blooming stages is the key to nurturing vibrant, long-lasting flowers—and don’t forget, every phase is a chance to deepen your green thumb! From the budding excitement to the post-bloom rest, each step offers a unique opportunity to adjust care and celebrate your plant’s beauty. 🌸
Ready to keep the magic going? Track your orchid’s progress with a simple journal or app, and use these insights to fine-tune your routine. Whether it’s tweaking light, adjusting water, or planning repotting, your orchid’s next bloom is just around the corner!