
Blooming
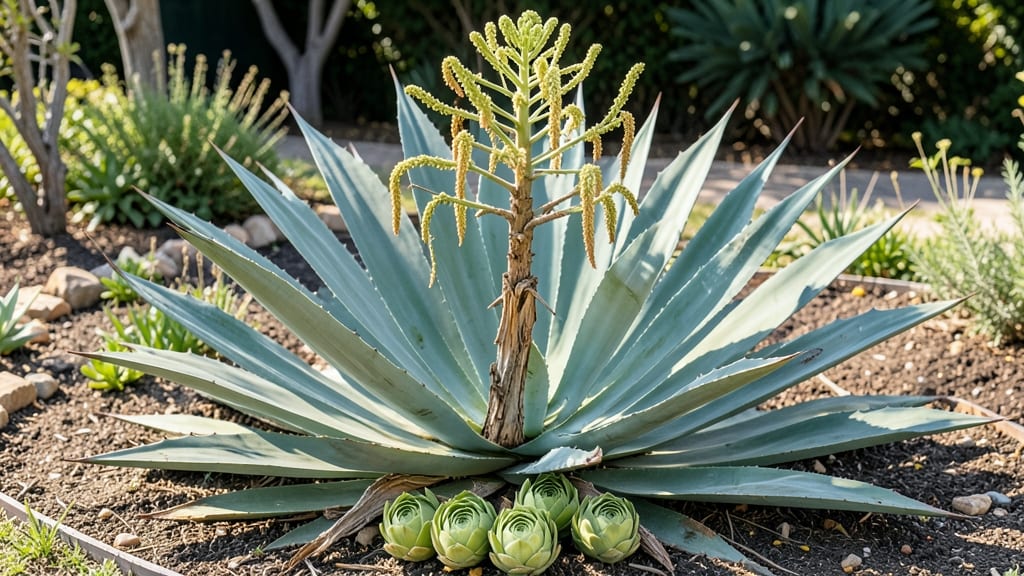
The giant agave death bloom is nature’s most dramatic farewell—a single, towering flower stalk that erupts from a decades-old plant, signaling its final act before dying. 🌵 I’ll never forget the first time I saw mine shoot up like a desert rocket, knowing it would bloom just once before the mother plant withered away.
This spectacle isn’t just stunning; it’s a rare opportunity to propagate new agaves from the pups that emerge afterward.
Most agaves take 10-20 years to bloom, but the show lasts only 6-8 weeks. The flower stalk can reach 10-15 feet tall, topped with a dense cluster of yellow or orange blooms that attract hummingbirds and bees.
The plant itself may look exhausted after flowering—its leaves start yellowing—but don’t despair. That’s when the real magic happens: pups (baby agaves) form at the base, ready to be harvested and replanted.
To make the most of this moment, water lightly during the bloom (but not too much—agaves hate soggy roots) and protect the stalk from strong winds. After flowering, the mother plant will slowly decline, but those pups are your future garden stars.
Dig them up once they’re 6-12 inches tall, and you’ll have a new generation of agaves to enjoy for decades.
This isn’t just a one-time event—it’s a lifecycle lesson in patience and renewal. Whether you’re a succulent collector or just love unique plant stories, the death bloom is a reminder that even the most striking plants have a dramatic exit. Here’s how to witness—and celebrate—it.
📚 In This Guide
- What you need
- Instructions
- Tips and common mistakes
- Wrapping up and next steps
What you need
- ● Giant agave plant (Agave americana) – A mature plant (10+ years old) with a thick, rosette-shaped base.
- ● Safety gear: Heavy-duty gloves (leather or cut-resistant)
- ● Long sleeves & pants (to protect from sap and spines)
- ○ Safety goggles (optional but recommended)
- ● Pruning tools: Pruning shears or loppers (for cutting the quiote stem)
- ● Handsaw (for thicker stems, if needed)
- ● Disinfectant – Rubbing alcohol (70%+) or bleach solution (1:10 ratio) to sterilize tools.
- ● Container or bucket – For collecting sap or storing harvested pieces (5+ gallon capacity).
- ● Camera or smartphone with a macro lens (for close-up shots of the quiote and flowers).
- ● Tripod or stabilizer (to capture time-lapse blooms).
- ● Notebook & pen (to track bloom timeline or note plant health).
- ● Compost bin (to repurpose leftover agave fibers post-harvest).
How to prepare for your agave's stunning death bloom
This is the moment every agave enthusiast waits for—when your plant puts on its final, breathtaking show.
🌱 Step 1: Identify the Right Agave Species
Not all agaves produce dramatic death blooms. Focus on species like Agave americana, Agave parryi, or Agave palmeri, which are known for their spectacular flowering stalks. Look for a mature plant with a thick, sturdy rosette—typically 10-20 years old—and a healthy, vibrant appearance. The older the plant, the more dramatic the bloom.
Here's the thing—you'll notice a thick, fleshy stem (called a "candelabra") begin to emerge from the center of the rosette. This is your first visual cue that the bloom cycle has started. If your plant is still compact with no central growth, it may not be ready yet. Patience is key here; forcing a bloom too early can stress the plant and reduce the spectacle.
☀️ Step 2: Optimize Growing Conditions for Bloom Success
Agaves thrive in full sun—at least 6-8 hours daily—and well-draining soil. Ensure your plant is in a location with maximum sunlight exposure, especially during the months leading up to the bloom. If you're in a cooler climate, consider moving the plant to a sheltered, sunny spot or even a greenhouse to mimic its natural desert conditions.
Watering becomes critical now. While agaves are drought-tolerant, a mature plant preparing for a bloom needs consistent moisture without being waterlogged. Water deeply every 2-3 weeks until the soil feels dry 2-3 inches down. Overwatering now can lead to rot, which will kill the plant before it even gets to bloom. You'll see the plant's leaves remain plump and vibrant—a sign it's thriving and ready for the big show.
✂️ Step 3: Support the Bloom Structure as It Grows
The bloom stalk can grow 10-20 feet tall and become quite heavy, especially in species like Agave americana. As the stalk emerges, gently tie it to a sturdy stake or trellis using soft plant ties or even old pantyhose. This prevents the stalk from snapping under its own weight or bending awkwardly. I like to use a 3-foot tall stake buried firmly next to the plant and secure the stalk at multiple points as it grows.
Watch for new side shoots (pups) forming at the base of the rosette. These are your future agaves! Once the main bloom stalk appears, the mother plant will begin to decline. This is natural—it's redirecting all its energy into the bloom. Don't panic if the leaves start yellowing or the center rosette collapses slightly. This is all part of the process, and the pups will eventually take over.
🌿 Step 4: Capture and Preserve the Bloom
The bloom itself is a stunning spectacle, but it's also fleeting. Agave flowers typically last 2-4 weeks before the plant fully dies back. To preserve the moment, take daily photos as the bloom unfolds. The flowers often start as tight buds and gradually open into vibrant, tubular shapes. Some species even attract hummingbirds and other pollinators—so keep an eye out for visitors!
If you want to save seeds for propagation, you'll need to hand-pollinate the flowers since agaves often don't self-pollinate effectively. Use a small paintbrush to transfer pollen from one flower to another on different stalks. Once pollinated, the flowers will develop seed pods. Collect these pods when they turn brown and dry, then extract the seeds for future planting. Real talk: this step is optional, but it's incredibly rewarding if you're a seed-saving enthusiast.
🪴 Step 5: Harvest Pups and Prepare for the Next Generation
After the bloom fades and the mother plant dies back, focus on the pups. These baby agaves will be your next generation. Wait until the mother plant is completely dead and the pups have developed their own root systems—usually a few weeks after the bloom. Gently dig around the base with a trowel, separating the pups from the mother plant's roots.
Transplant the pups into their own pots or directly into the ground, ensuring they have plenty of space to grow. With proper care, these pups will mature in 10-20 years and put on their own spectacular death blooms. It's a full-circle moment that makes the wait worthwhile. Until then, enjoy the show—and the knowledge that you're part of the agave's incredible life cycle.
Tips & tricks for perfect agave death bloom preparation
Watching an agave reach its death bloom is like witnessing nature's grand finale—here's how to make sure your plant puts on the best show possible.
Species Selection: The difference between a spectacular bloom and a disappointment often comes down to choosing the right species. Agave americana and Agave parryi are your best bets for dramatic displays, but Agave palmeri offers a more compact yet equally stunning performance. If you're unsure about your plant's species, check for the characteristic thick, sturdy rosette and wait until it's at least 10 years old before expecting a bloom. Confession: I once tried to force a bloom on a young plant and ended up with a stressed, sad agave that never recovered.
Sunlight Strategy: Those 6-8 hours of direct sunlight aren't just a recommendation—they're non-negotiable for a successful bloom. If your agave isn't getting enough light, consider moving it to a south-facing window or even into a greenhouse during the critical months before the bloom. I've seen agaves in cooler climates thrive when given a temporary boost of sunlight, especially in the months leading up to the bloom cycle. Watch for leaves that remain vibrant and plump—this is your plant's way of telling you it's ready for the big show.
Support System: That 10-20 foot tall stalk isn't just impressive—it's heavy! A 3-foot tall stake buried firmly next to your agave is your best friend here. I use soft plant ties or even old pantyhose to secure the stalk at multiple points as it grows. This prevents the stalk from snapping under its own weight or bending awkwardly. Pro tip: Check the ties every few days during the bloom's rapid growth phase—you don't want to accidentally strangle the stalk as it expands.
Documentation: The bloom is fleeting, but your memories don't have to be. Set up a simple photo schedule to capture the transformation from tight buds to fully opened flowers. I like to take photos every other day during the bloom's peak, especially in the early morning when the light is softest. This creates a beautiful record of your agave's life cycle. For the extra enthusiastic, consider setting up a small tripod or even a time-lapse camera to capture the full progression—it's like having your own nature documentary right in your garden.
Pro Tips for Giant Agave Death Bloom
- Watching an agave reach its death bloom is like witnessing nature's grand finale—here's how to make sure your plant p...
- Species Selection: The difference between a spectacular bloom and a disappointment often comes down to choosing the r...
- Sunlight Strategy: Those 6-8 hours of direct sunlight aren't just a recommendation—they're non-negotiable for a succe...
Frequently asked questions
How long does the giant agave bloom last before dying?
The death bloom typically lasts 7–10 days from first flower emergence. After pollination, the plant’s energy shifts to seed production, and within weeks, the rosette collapses. Pro tip: If you’re growing agave for harvest, mark the bloom date—harvest the piñas (hearts) 1–2 weeks after flowering for peak sweetness.
Can I stop my agave from blooming to save the plant?
Nope! The bloom is a one-time, natural process triggered by maturity (often 10+ years old). Cutting the flower stalk won’t prevent death—it’s genetically programmed. Work with it: Harvest the piña (edible heart) for tequila/food, then repot or replant pups (offsets) that sprout at the base.
What do I do with the agave after it blooms?
Once the rosette yellows and dies, remove the dead center (it won’t regrow). Focus on the pups (baby plants) forming at the base—transplant them! The mother plant’s purpose is done, but its legacy lives on. Bonus: The dried flower stalk makes a stunning dried arrangement for 1–2 years.
Why did my agave bloom but no pups grew?
Some agave varieties (like Agave americana) rarely produce pups—it’s normal! Others need bright light, well-draining soil, and patience. If your plant is healthy but pup-less, check for:
- Age: Younger agave (under 5 years) may not bloom yet.
- Stress: Overwatering or poor soil can delay reproduction.
- Variety: Some (like Agave tequilana) are prolific; others aren’t.
If the plant is otherwise thriving, it’s not a cause for concern!
Is the agave safe to eat after blooming?
Yes! The piña (heart) is edible before the bloom (when it’s sweet and tender) and can be harvested up to 2 weeks after flowering (though it becomes fibrous). Never eat: The flower stalk (toxic) or the death-rotted base. Pro tip: Roast or ferment the piña for mezcal—just avoid the inedible parts!
Wrapping up and next steps
The giant agave death bloom is a breathtaking spectacle—nature’s way of signaling the end of a long journey before the plant’s final harvest. Witnessing this rare event reminds us of the beauty in cycles, from growth to transformation. 🌱✨
Ready to experience it firsthand? Start by researching local agave farms or nurseries that cultivate these stunning plants. If you’re growing your own, keep an eye on your agave—you never know when its dramatic finale might unfold!